
Privacy was probably my number one concern when considering living out of my car. I didn’t want anyone to be able to look through my windows and see me lying in there, for reasons of safety and of not being caught and asked to leave wherever I was parked. I also didn’t want to be woken up by excess light coming from passing cars or even the rising sun. So all together, I needed privacy window covers that blocked out all light, were easy to setup, simple to store, and were difficult for anyone outside to know they were in place. And that’s exactly what I made!
In this post I’ll discuss in detail what I made, how I did it, some problems I had, and what I did to solve them. Of everything I’ve learned about sleeping in a car, these privacy window covers are probably the thing I’m most excited to share since I think it’s so important and so equally overlooked. Let’s get started!
The Idea
I had a general idea of what I wanted to make. I knew I was going to use a material called Reflectix (basically a metallic bubble-wrap used in housing insulation, Here’s a link to the one I bought) and I would wrap the Reflectix in some kind of fabric to make it more appealing to look at from the inside and indistinguishable from the window from the outside. I was planning to use a spray adhesive like 3M’s Super 77 (Amazon Link), but I wasn’t sure how to affix the edges of the fabric, either sewing them or using two layers of Reflectix and trapping the raw edges between the two panels. Besides figuring these details out, I had some other concerns.
The Problem with Reflectix
 As an engineer, I had to look at all of these materials to see if they would work for my application. I wanted to use Reflectix because it’s what everyone else was using to insulate their vans and car campers. But, I found that it’s actually not very good for this application.
Reflectix is a composite insulation system usually used in basement ceilings and between roof trusses. It only has an insulative “R” value when it is allowed to have an air gap between two panels of the material. This trapped air is how the insulation works. In our application as vehicle dwellers, placing this right up against the hot metal walls of a van or against a window, it only acts as a radiation barrier and doesn’t actually do much to prevent heat from passing right through from either side.
That all being said, I couldn’t think of another material rigid and yet flexible for pushing these into the window sills of my car and then storing them. I could have used foam board, but those would have broken after a few uses and any other rigid material wouldn’t contour to the window’s curves. So even though I knew I wouldn’t get as much insulation as I could from this material, I continued to use Reflectix through this project.
Prototyping
Okay, with all that planning stuffs for these privacy window covers out of the way, my first step was to go out to my car and make paper templates of the windows. I happen to have a giant roll of brown paper which made this easy, but you could use poster board, flattened out paper shopping bags, or piecemeal printer paper. The goal is to get an accurate template of each window shape in the car. And since the two door and back side windows are symmetric I only had to take one template of each.

If you look closely, you might notice that I didn’t take a template of the front windshield. This was intentional. I already have a reflective cover for my windshield, and so I didn’t feel the need to make my own. And more importantly, people expect to see those kinds of window covers already, it would be strange to see a cars entire front window blacked out by my privacy window cover.
Anyway, now it was time to buy all of the material. I used the paper templates to measure the size of fabric I would need to cover the pieces and headed over to JoAnn Fabrics. Originally, I wanted to purchase felt because it would have great light absorbing properties, and I still think it would be a great choice. But, JoAnn’s had some fleece on sale at the time for about half the price of the felt. I purchased a couple yards of black (for the outward facing side) and an equal amount of white (for the inside).

Before I started making all the covers, I wanted to test out my idea. So, I took the smallest window template in the car and cut out a few Reflectix panels that matched the template, and then cut out each fabric color with about an inch of overlap. Then came the trial and error part…
Remember how I said I wanted to sew these? Well I actually tried it. Wrapped the fabric around a single layer of Reflectix and tucked the edges of the white fabric and placed that on top of the open edges of black fabric and the exposed Reflectix. If your keeping score, that’s now four layers of heavy fleece and a layer of Reflectix. Which my sewing machine didn’t want anything to do with. The stack was way to thick and too squishy to be moved through the feed-dogs of my machine. So, I had to scrap that idea and moved to plan B.
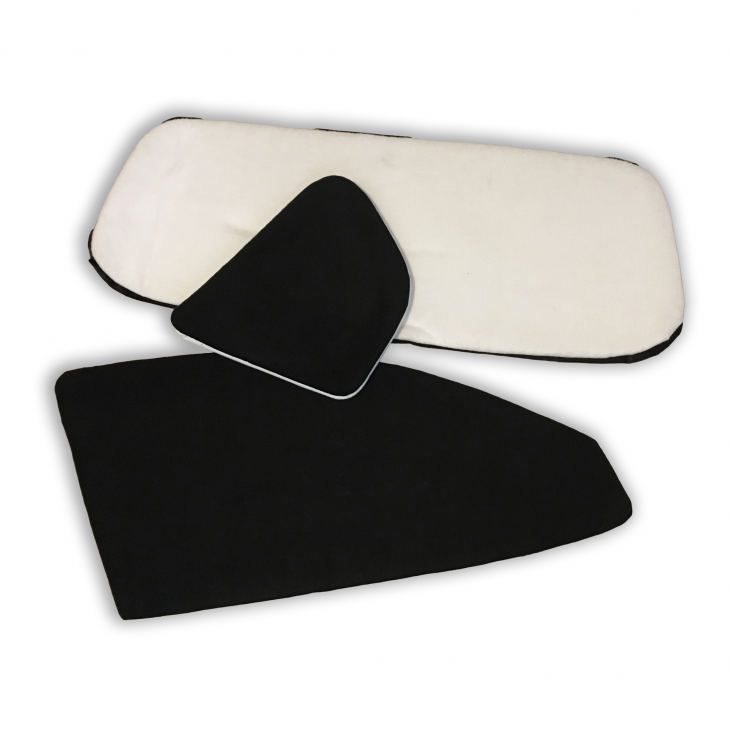
Taking two layers of reflectix now, I used the Super 77 spray adhesive to attach the fabric to each separate piece of Reflectix. Then, I again used the spray adhesive to attach the two panels together, trapping the raw edges of the fabric between the panels. This looked much cleaner and was surprisingly sturdy, not feeling like it would fall apart.

Now with one finished, I couldn’t help myself from taking it out to my car and popping it into the window to see how it looked.

The interior looked really nice with the white fabric. It made the space feel a bit more roomy having those in there opposed to a darker color. And the cover did a great job of wedging into the window sill and didn’t need any other help staying put. The picture below requires a bit of explaining to know how awesome it is!

I have all my lights on in the car and they are pretty bright. You can see into the car through the back door window, and directly to the right of that is the window with the cover in it. That big piece of black, the the right of the image, framed by the red metal skin of the car should be as see through as the other window in the shot, but it’s not! It actually took me a second to realize where I had put up the test privacy window cover, because it worked so well in preventing light in or out.
The only way to tell it was there was to shine a flashlight directly into the window and look closely to see the fabric behind the glass. Barring that, it was completely undetectable. With this success in and, I continued with the rest of the covers!
Production

Using the paper templates I took earlier, I cut out two panels of Reflectix per window. One tip that I can give if you want to use this same construction, orient the creases in the Reflectix to be perpendicular in each panel. Because this material is sold rolled up, there are creases and folds that can’t be removed. If you cut your pieces so that these creases are 90° apart from eachother it will yield a much more rigid panel. The careful reader will notice that I failed to do this, so definitely listen to Lucas of the future on this one!

It was also important to stay organized since all the panels looked similar and could have easily become mixed when proceeding to cover each panel in fabric. Above you can see me using a Sharpie to denote inside/outside layers and right/left side for the the applicable panels.

I was really glad to have taken all of these cutouts to my car for a dry fit. Almost all of them didn’t fit properly, and with the help of my scissors I reshaped them all to best fit the windows, keeping in mind that the fabric would also add some interference between the covers and the window frames.
While I was down at the car, I also took note of the covers that were directly contacting a steel door frame. On these sides I planned to add magnets to better hold in the covers.

With all the planning accomplished, I began the long process of tracing all the panels onto the fabric leaving about a 1 inch of allowance to be wrapped around the edge of the Reflectix.


With all the fabric cut out, I started the process of attaching it to the Reflectix using the Super 77 spray adhesive (Amazon Link). I placed small rare earth magnets (like these: Amazon Link) on the edges of the Reflectix and folded over the fabric edges using scissors to make small cuts around the curves and corners allowing the fabric to sit flat. I was very careful to note which panel of each pair went on the outside and which went on the inside. Because, when I cut the Reflectix to match the car during the dry fit, it made all the panels slightly different.

Marking with a Sharpie the location of each panel was very helpful, just make sure not to put markings on the side where the white fabric is attached. The black on silver shows right through and I had to disassemble some of the panels to clean this up.
With the fabric attached on both halves of each panel, I used the same spray adhesive to join the halves, making sure all the edges lined up. The Super 77 spray adhesive is a contact cement, so make sure to let the two sides dry a little before pushing them together.

Testing
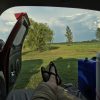
As soon as I finished all the panels I ran down to the car and pushed them all into place. They were very easy to locate since they all could only go in one way now with the black sides facing outwards and the white sides facing inwards. I took a video of the results as seen below:

I was sitting in my car in the middle of the day. Those touch lights are not very bright, but because the window covers blocked out all the light, they were needed to see inside the car! You can really see the effectiveness of the when I open the door. I have my regular reflective front window cover up, and its light seal isn’t as good as the covers I made.
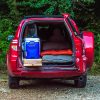
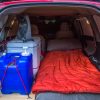
Shortly after I finished the window covers, I set up the sleeping space in the car and went to sleep in the parking lot of my apartment to test out some of my systems. I learned a lot from that simple test!

It proved to me that the window covers blocked out a lot of light that would have kept me awake. They also isolated me from some of the road noise and foot traffic outside my vehicle. The black fabric also worked perfectly and the car looked like any other parked car in the apartment lot. And some more icing on the cake, the fleece fabric of the covers absorbed excess moisture and prevented the windows from fogging! This would also mean I would have to make sure they could dry, or I would risk molding (this never became a problem). However, even though the window covers were exceptional at blocking out everything I wanted, I quickly realized that they also blocked out the air.
First Problem
I had all my windows cracked open as far as they could go and still be covered by the rain guards on my car. I initially though that air would seep through the edges of the window covers and that would allow circulation, but air is much lazier than that. In my test, I bent the top edge of the window covers down to open the interior of the car to the outside air. But, the semi-rigid stacks of Reflectix and fabric always bounced back into a flat sheet. I wanted to still be able to press the window covers in flat to block out all light, but I needed a way to hold the top edges down while I slept.
My solution was to use some thick armature wire (Amazon Link) to build an internal, bendable structure in each panel that was over an opening window. Below you can see the type of wire I’m talking about. It’s very pliable and can be bent over and over again without breaking.

I arranged the wire in a zig-zag pattern of roughly four inch by five inch rectangles all the way along the length of the panel where the window opened.

I simply pealed apart the two halves of each window cover, and then placed in the wire, and used some more spray adhesive to join everything back together.

The finished covers would now bend and stay in place, letting is as much air as I wanted!

Having the tops of the window covers not be in contact with the car window frames made some of them not want to stay in place. This made them a little more finicky to setup (especially when opening and closing doors) than I would have liked, but I got the hang of it after a little while.
Some More Problems
I was staying with some family right before I left on my trip to Maine. We had a chance to go camping and I thought it would be a good opportunity to have another test of the car. At the time everything was loaded in that I would be taking with me. Right away, I noticed a fairly big problem. Having all the window covers bent to let in air worked really great, but they also created huge entrances for bugs. This completely escaped my mind, and would be a major problem in the mosquito infested state I would be heading to.
So I improvised a solution, adding store bought fabric tulle, framed it with way to expensive velcro, and added the assemble to the tops of the window covers. The idea was to fold open the window cover and attach the netting around the opening. The headliner in my car could be used as the loop side of the velcro.

This was a good short term fix, but the modification had so many problems I won’t bother to show the construction. The tulle was way too weak, the velcro started to tear up my headliner, and the covers would fall out of the frames when I opened a doors because they were attached to the ceiling. They did keep bugs out of the car, but let in more and more as the netting wore.

Another annoyance I found well into the trip, was if I left the covers up for an extended period, the Reflectix would loose its rigidity. So the covers would just fall out or have trouble just going up. I had to take them down regularly and massage the edges of the window covers to flatten out the Reflectix to make them fit again.

Future Improvements
Even with all the above problems, I still think these privacy window covers suited me very well, and continue to with some adjustments. The black fabric was more effective than I could have ever imagined. Also, I now know that I can get plenty of airflow from just four cracked windows, even in a southern summer. I’m working on making a much better version of these privacy window covers, and producing plans on how to make them for any vehicle, so watch out for that!
Did I miss something? Do you have a better solution to cover your windows? I’d love to hear your questions and comments on this content below!

[…] If you want to find out all the details of how I build these covers, got great airflow through them, and bug proofed them, check out this dedicated article: Make The Best Privacy Window Covers – Complete Guide […]
I have to Rav4 2005 long time. .Im very glad to use this hard and good for any modification car. . ITS very very interesting website . Grettings grom southern Poland Adrian Hamradio operator from Krakow city. Sq9fcb . One time in 2013 i make diy roofrack (aluminium) . I was in my rav4 on the eurotrip Poland Czech Austria ..Grossglockner .. Italy France ….and far far away
Lucas, I have an 2007 RAV4. Any change I could pay you to make the window cover for me?
Hi Lucas, have you had time to do any updates on your window coverings or fans?
If so, would love to hear about them!
Lucas, Your articles are super detailed and well done. I want to learn MORE from you! Please make more!
Gutter screens cut to fit,will slide into channel,have about 4inches of outside air. Wouldn’t have to attach anything to your window thingys(technical term,hehe). loving all your ideas which I plan on using for my Honda pilot to go on the road. Aaand I also plan on going to Maine,my land of heritage,also spent all my summers there when I was growing up.
Awesome post, great site, very inspirational! I just test-drove a used van (decided not to buy it) but the young owner from Spain had made simpler, single-layer reflectix screens, with one difference: he used packing tape around the edges, that he left “flapped.” In other words, rather than wrapping the tape tight around, allowing maximum tape-to-reflectix adhesion, he left much of the tape out, stuck to itself, giving a super-thin flap all the way around. He called these “eyelashes” (pestañas) and he slipped them into the rubber and fabric gaskets all around the windows. I only saw him demonstrate this with a front passenger window; I’m not sure how it works on the “fixed” windows but it seemed like a great idea and seemed to work really well. He said “everyone” uses them in Spain.
Lucas, thanks for the info. You really have some good ideas here.
I’m confused about ” orient the creases in the Reflectix to be perpendicular in each panel.” Perpendicular to what?
You have two layers of Reflectix, when you cement them together have the lines perpendicular. 🙂
I was wondering also. Does he mean the lines in the two Reflectix panels being glued together should run different directions from each other.
Perpendicular to each other. Like the layers in plywood,
This was a great tutorial! I just finished assembling window covers for my 2010 Rav4. You honestly can’t tell there’s anything in the window, even in full daylight. I used strips of duct tape running perpendicular to the curve of the reflectix to reinforce the panel as a whole, and ended up hand-sewing all the edges of the covers–after adhering them to each other, there were several spots where the two sides didn’t fully match up. I wanted a cleaner look, and I was also thinking that over time, pushing and pulling the two pieces into and out of the window might eventually wear down on the glue at the edges, and I wanted these to be as durable as possible. Sewing the panels had the added benefit of stiffening the edges, and they’re really satisfying to pop into the window. Thanks for this article 🙂
I am following your plan so that I may car camp across the country this winter. Wondering why you used 2 layers of reflectix?
That was explained at the very beginning of the post.
[…] warmth by putting a thick reflective sun shield in your front windshield, and cutting insets out of Reflectix wrap (available at most hardware stores) for your other windows. Push the insets into the windows before […]
That was a great tutorial. Thanks for posting it.
I really enjoyed reading your article Thank you for all the tips and tricks that you learned along the way
Thanks for sharing this info
[…] car a bedroom-like feel. Another option is to make or buy your own custom window covers. Check out this cool guide for […]
P
Layers of Reflectix perpendicular to each other. Like the layers in plywood,
One aspect that I just don’t understand is the folding portion of the covers designed to let air through. I understand using the armature to stiffen the sub-panel….but did you cut these out and attach them to the main panel? If not, how do they “hinge” with the reflextix layers biased to each other?
I’d be interested in any updates you have on this. And also on the screening component and how that worked out. I have a Gen3 RAV4 that I’m outfitting.
I understand the best application of the foil reflecting layer is to be “backed up” by an air gap. I was thinking it may be possible to achieve this with some 3/4″ strips of cardboard zig-zagged and glued between the two panels. Basically the way a hollow core door is made. The edge could be built up all around the perimeter using old foam sleeping pad (Ensolite). Although it would make them a bit more difficult to stow, you could make the top “rim” of he panel out of pine…and thereby have a substrate you could “hinge” the top panels and the screen panel to. I’m trying to think of a way that the screen panel would have a semi-rigid perimeter frame…basically so it’s structurally part of the main panel, and then there would be an inside hinging “flap” panel to cover that up. Couple tabs of Velcro would allow it to be fastened in the closed position and the open position as well.
Excellent ideas. You are very OCD…which is a compliment and an asset for an engineer. I’m more-or-less in the same boat as an architect.
Post any improvements you made,..both to the panels or your overall rig.
Thanks for the great information, and photos. A real asset to the community.
I’m looking at ideas to convert my Jeep Grand Cherokee into a camping vehicle. I like the idea of the covers for all the windows. Do you think that cutting up a manufactured shade and affixing it to cardboard on one side and black material on the other side would work? Reflecting sunlight during the day and blacking out windows at night. The other solution for bugs that I thought about was a mesh window sock that uses a magnetic strip at the bottom to stay against the vehicle.
Tully would be perfect for what you were trying. You just need to leave little extra for the stretching of doors opening. Also fully like all materials gets stronger with multiple layers. If you really want creative flow I would get 3 to 4 different colors and layer them to get that psychedelic look and vibe. Attachment I would have to play with ideas myself but here are a few to get you started. 1. A short curtain rode. Like ones used for RV. 2. Hanging it off of those hooks already installed in cars for hanging jackets, suits, and cargo nets. 3. Velcro or thin magnet strips on door frames. 4. For each window panel make a solid frame around top that won’t bend and attach Tully to that so it’s all still in the whole unit
That’s a great idea!
[…] adding some Reflectix to the windows for added privacy. A fellow blogger by the name of Lucas has a great write up on some ways to do […]
I’m in Australia first time I lived in my car I used the black window Sox as they are made of netting so you can stretch over your window and wind your window down a little , get air and not get bugs in. I only had a hatchback then. They did give some level of privacy, i stuffed the window Sox with reflective panels. but i have an Honda CR-V suv now and maybe about to do it again so I have more windows to cover, so considering my options but definitely will get window Sox again. So cheap and lasted me three years even going through lots of rain. . Also considering window tinting. And definitely a black curtain for the rear window. I did it in winter .
ADCO cover suits our 2015 Ford E450 pretty nicely. With this, the cab is unfolded as indoor space; negating one curtain. Velcro straps fasten alongside the lowest beneath neath every replicate stem. A pocket slips over the pinnacle rear of every door. A sturdy magnet is blanketed and sewn in every decreased rear corner. It did now no longer budge in winds gusting to twenty MPH. Another gain is for the duration of wintry weather tenting it’s going to save you frost & ice buildup on our windshield. We are 150% happy with this purchase.
[…] then I’d recommend making custom-made reflectix coverings like proven in this video and this weblog put up. You should purchase ready-made full automobile sunshade kits from firms like Climate […]
[…] They should fit neatly into the window sill and completely block all light. They also act as insulators to keep the car warmer or cooler. you can find exact instructions here. […]