
I decided to convert my Toyota RAV4 into a camper that I could live out of, in preparation for a trip up and around the east coast, starting in Florida with a destination somewhere in Maine.
My goals for the build were to have as much storage as possible, a level surface to sleep on, be able to keep the passenger seat functional, have enough “counter-space” to prep and cook food easily, maximize privacy, get adequate ventilation, maintain full visibility through all the windows while driving, and do this all for only a couple hundred bucks.
I had limited funds since I had saved for the trip as a whole, and the more I spent on the conversion the less time I could spend on the road. Anyway, I had a free weekend open up and I headed home to utilize my Dad’s tools and woodworking expertise, here’s what we came up with:
Preparing the Car
When the back seats are folded down in the RAV4 they have a slope that, presumably, is there to more easily unload the car when hauling large objects. This wouldn’t have been very comfortable to sleep on, especially because my head would be hanging off the edge of back seat, since they didn’t actually reach far enough anyway.
So, I decided to remove them entirely and see how much space that gave me in the car. It was a lot!

We removed everything else that could come out, like all of the plastic well covers and the carpets. The RAV4 has its spare tire on the back door, so there is this huge cavity to use for storage where the spare would normally go on a car.
The RAV4 is a small SUV and there is so much room in it! I mean seriously, you could exercise and do yoga all within the walls of the car! (Ask me how I know that).
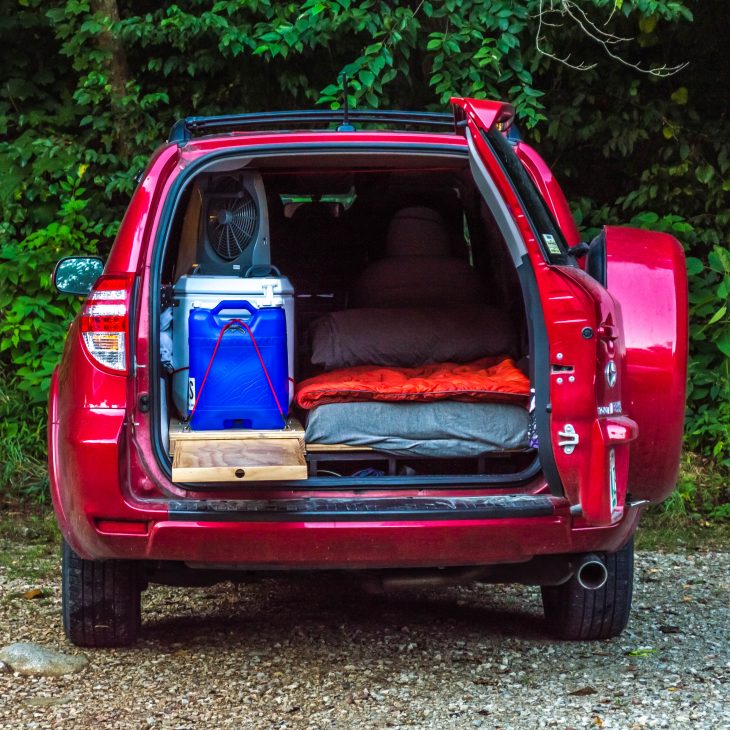
It was at this time I decided to start thinking about how I would design the sleeping platform and other structures. I knew I wanted the single wide sleeping platform on the passenger side and the cooler tucked up against the driver’s side wall, but that’s all I knew. I didn’t know how any of this would fit together or what materials I would need or how I would actually make everything fit.
So, with everything out of the car, dimensions were taken and we made a lot of sketches…
Sleeping Platform
I wanted as much headroom as possible, and the ability to fully sit up in bed was really important to me. My RAV has a tall, grey, plastic tray between the wheel wells. And underneath was the metal floor of the vehicle where the rear axle lives. It didn’t create much extra space to remove that piece so we reinstalled it. Fortunately, there was still plenty of head space left above that axle cover so all I had to do was make the sleeping platform rest as close to that hump in the floor as possible.
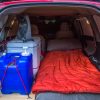
After a bit of figuring, I found out that everything for the sleeping platform and the area for the cooler to sit, would fit in a single 4’x8′ sheet of plywood. The cooler’s thickness would determine how big it’s platform would be, and the remaining space between the coolers platform and the passenger side wall would be used for the sleeping platform.
I also needed to think about how I would access the storage in the back with the sleeping platform completely covering it, and how I would extend the platform when I slid the passenger seat forward.
After all that was figured out, we ran over to HomeDepot and I bought a 3/4″ thick sheet of pine plywood, several quartersawn 1″x2″x12′ boards (to build the supports), and a piano hinge (to made a storage access door in the back and hinge the extension tongue in the front).

With the materials in hand, we started building the support structures for the sleeping platform. Each one was totally custom and had to accommodate for the really wonky floor of the car. Why couldn’t they have made it flat?!
Also, that forward support in the image above, is bolted into the car using the same attachment points the back seats used. With the sleeping platform to be screwed onto this piece, the whole construction would be very sturdy and wouldn’t rattle around.
Anyway, it didn’t take too long and now with a level support structure to work on, we slid the plywood platform in and scribed the interior wall’s shape onto it. Cutting on the lines with a saber saw and then refitting the piece back into the car showed us we had a long ways to go before it would fit properly up against the curvy plastic molding.

Eventually—after a lot of sanding and cutting—the sleeping platform fit as good as it needed to! Now our attention was turned to the platform that would hold the cooler and house the kitchen table (Yes, I did mean to say “kitchen table”).

Table
I really like to cook, and I wanted a space of my own where I could comfortably prepare food in my RAV4 camper.
For this, I needed some “counter space”. I thought about searching around and buying a little camp table, that I would store somewhere in the car and take out when needed. But, this would take up a lot of storage, and I also didn’t want some flimsy table to work on.

My Dad pointed out that the same 1″ X 2″ boards used to build the supports could be used to separate two pieces of plywood creating a little box. This would act as a platform for my cooler, and a single sheet of plywood could slide in and out of it to act like a table.
I wanted the table to be a little more sturdy. So, I added that the same one by two’s could also be used as a frame the movable piece of plywood. This would also mean that the only wood touching the bottom of the plywood box—as the table slid in and out—would be two, one inch strips of wood instead of an entire surface of plywood.

How cool is that! The box and table assembly rests atop the same support structure as the sleeping platform, and fits into the space between the sleeping platform’s edge and the driver side wheel well. It all came together really well and after a ton of sanding (I really like sanding things), the table was super smooth and all the surfaces were ready to be sealed.
Storage
Remember that piano hinge I bought earlier in the post? Well, it was time to hack it apart and start making doors on the sleeping platform!
If you look up at that picture of the car totally empty, you’ll see that huge open cavity in the back of the car. We built the bed platform supports so they would hug the walls of that pit of storage, and in doing so very little of that space was wasted. One problem though…
The sleeping platform and table assembly not totally covered the opening to that storage. So, I measured out a rectangle that would fit within the support frame (that way the sleeping platform would act like a door jam), and cut it out of the sleeping platform with a saber saw.
Then I cut a piece of the piano hinge to the right length and sanded down both of the hinge brackets so I could sink the hinge’s… hinge flush with the surface of the bed. Don’t want anything poking up and making it hard to fall asleep! Now I could access the rear storage very easily!
At this time, I also cut out and hinged a plywood piece to fill the gap towards the front of the bed when the passenger seat was pushed forward. This tongue would then fold down when I wanted to put the passenger seat back in a seating position.

I could honestly play with this all day! The design made it very easy and unobtrusive to fold that part of the bed. But, that support on the tongue does take up some valuable storage space under the platform.
Since I would need to get my hands in and out of there to fold and unfold the bed, I stored light things (mostly shoes) in the path of motion. Despite this, having a full length bed while still being able to use the passenger seat was well worth the small storage sacrifice.
The last big storage decision was: what to do with the big open space where the driver side back seat went? As you can see from the above .gif there’s nothing there, and that’s exactly what I wanted.
We could have built up a dresser to store my clothes and house an external battery, and a bunch of other features. But I still didn’t know if I would want to live in the car for more than a few nights. So, at least for now, I left that space empty and stored all my belongings in bags. This actually turned out to work really well and was much more versatile!
Assembly
Now with everything sorted out, all of the parts were disassembled and readied for paint!


All of the support structure got a few coats of black enamel paint to protect the wood and make them a little less visible. I think it just looks cool when you see all the wood platforms being held up by what looks like nothing!

Then, everything else got a bunch of coats of lacquer. Probably wasn’t the best finishing option, but my dad had it set up in a spray gun already so why not?! The lacquer gave the wood a nice satin finish, which helped the table mechanism to work, but also made the bed platform pretty slippery (more on how I fixed this below).
Anyway, here’s a .gif of it all coming together:


I love how it all turned out! The simplicity of the build is probably my favorite part. I’ve seen other builds with complicated folding mechanisms or an internal kitchen or solar setup, but for now this is exactly what I need.
Although, at this point, the conversion is still far from the day I could sleep out of it, I still had a lot to do.
Window Covers
The thing that scared me the most about sleeping in my vehicle was not having enough privacy. The windows on my car are tinted, and I could get them darker if I wanted, but i wasn’t interested in having a perpetual pair of sunglasses obstructing my view of the world while I drove. Plus, tinted windows still let in light, so good luck trying to sleep in!
Instead, I thought long and hard about some kind of curtain or window covers to give me the maximum light blockage while also providing a bit of thermal insulation.
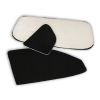
I settled on an idea of using Reflectix (Amazon Link) as a structural and thermal material, and then wrapping the Reflectix panels with some fabric to make it look nice.

Those are all of the Reflectix panels, two for each window.

Light absorbing fabric was spray adhesived onto the panels and then the two sides were spray adhesived together.


The above image is with all the internal lights on at night. That black area of my RAV, to the right of the image, is actually one of the rear windows with the cover in place. No light out, and no light in!

That video was taken in the middle of the day, you can see the only light coming in is from the off the shelf front windshield cover. Sleeping in all morning here I come! (I actually rarely ever slept in, but more on that in a future article).
If you want to find out all the details of how I build these covers, got great airflow through them, and bug proofed them, check out this dedicated article: Make The Best Privacy Window Covers – Complete Guide
Extractor Fan
Another thing I was worried about when living in my RAV4, was proper heat regulation. Ideally, I would add something like a Fantastic Fan (like this one: Amazon Link), but I didn’t want to permanently alter my car by cutting a massive hole in the roof.
Instead, I thought about utilizing my sun-roof. Like most cars, the RAV4’s sunroof can tilt forward to crack the back edge of the sliding window. I wanted to design some kind of fan unit to fit into that crack and through out the hot air floating around the top of the car.
So, I ordered a pair of low powered USB computer fans that are typically used to cool TV cabinets (Amazon Link). I designed a shroud to adapt the four inch square fan opening to a wide slit that would fit into the gap in the sun-roof.
I’m an engineer, so it’s my duty to go wayyyyy overboard on this build, so I designed the shrouds in a computer modeling program and 3D printed them out of PLA plastic.

The shrouds were so big I had to print them in 2 pieces. That’s 2 prints per fan, for 2 fans, equals a whopping 24 hours of printing!

After removing the support material (the structure that helps the big overhangs print properly), I screwed the pieces onto the fans and taped over the seam between the halves to prevent air from leaking out. Why are they printed in different colors? If I used a single color I would have gone through my entire store of that plastic spool and then some. So I decided to make it really colorful…

And then spray paint it to match my car. I’m not completely OCD or anything…


The idea worked flawlessly! After only a couple minutes of being turned on these fans bring the inside of my RAV4 very close to outside air temperatures. And since they blow out, they prevent hot air from accumulating in the vehicle.
However, I will be updating this design in the future. The way they hold themselves into the sunroof is a little finicky and they fell down a few time from just being bumped. And the PLA plastic I used to print these is very low temperature, so when the car got exceedingly hot on several summery occasions, the shrouds started to become malleable. Which is not a good thing.
If you’d like to learn more about these vent fans and see how they work check out my article: How to Stay Cool When Sleeping in a Car.
Odds and Ends:
Now with the big stuff sorted out, I set my attention to making the car more comfortable and practical for when I started to live in it.
Fan
To circulate air around the inside of my car I got a 10 inch fan that was also rechargeable: Amazon Link. This fan turned out to work really great. You can use either the replaceable D-cell batteries or the rechargeable battery to run the fan, and it will default to using the rechargeable before depleting the disposable batteries.
I would recharge the battery using my cars power while I drove around and then that charge would usually last me through the night. The D-cells last for about 56 hours so I only ever needed to replace those once because I stayed in one place for a couple days in a row. I can’t recommend this fan enough if your looking to save money on buying batteries.
Rain Guards
 I added this set of rain guards (Amazon Link) to my RAV so I could crack open my windows at night without being too obvious. Also, If it happened to be raining I didn’t want to have to worry about not being able to ventilate the car while I slept in fear of getting wet.
Tiedowns
I needed a way to hold my cooler and water tank down to the platform while I drive. Where the two are full it’s not that big of an issue because their weight holds them down. But when they’re empty, they slip and slide and don’t behave very nicely to the interior to my RAV.

So I got these kayak tie downs (Amazon Link) and some screws from the hardware store and attached them towards the edges of the containers they would be tethering. I also ordered bungee cord (Amazon Link) and some bungee cord hooks (Amazon Link) to make custom length bungee straps to tie down the water jug and cooler. Oh! and I got this awesome 7 gallon water tank by the way: Amazon Link.


Lights
The last thing I wanted to do when getting ready for bed would be to try and hold a flashlight in my mouth while attempting to brush my teeth (yes, that is quite the predicament) or while putting on my clothes. Also, uneven lighting from a single point source is something that really bothers my eyes, so I needed a better long term solution.
I found these touch activated lights (Amazon Link) with a warm color temperature and built in dimmers.

The light is very diffused and the dimability let’s me set them to a comfortable brightness level and everywhere in between. My car looks like the inside of an art gallery now!

Mattress
I was on the fence for awhile on whether I should get a mattress or not. I personally don’t mind sleeping on a firm surface, so I thought I would just fold up a few blankets and call it there. But as I thought about that more and more, I considered how this would make it difficult to store the bed, and maintaining it would be annoying as all the blanket layers would probably fall apart frequently.
While I was thinking about this, I stumbled on a mattress that was literally the perfect length, width, and thickness for my sleeping platform. So, I pulled the trigger on it and I am so glad I did!
It’s a cot sized mattress designed to be bought as a spare bed, but also happens to work perfectly for sleeping in a car. It wasn’t cheap (check the current price on Amazon) but it was well worth the investment!

To keep the mattress from sliding around, I used an inexpensive yoga mat to give the mattress a bit of grip.
Cooler Upgrades
While I had the Reflectix out for the window covers, I decided to add some extra insulation to my inexpensive Coleman cooler (Amazon Link). I did a couple other things to the cooler to make it work better than advertised.
There’s too much to talk about on the subject here, so I’ll write a dedicated post in the future.

Functionality
To make sure I had thought of everything, I ran a couple tests for a couple of the scenarios I would face.
I took my car to a local park and went through the process of cooking lunch. I immediately found a ton of flaws in how I stored all of my cooking utensils. I also learned of the need to prioritize parking in the shade, as the noon sun was incredibly hot.
I went through the entire process of prepping my food, cooking, cleaning, and putting everything back where it came. I found so much to improve that I went home and completely redesigned my thinking on how I would cook in the RAV4.

I also spent a night in the RAV4 while parked in my apartment’s parking lot. This was the big test, to see if this idea of sleeping in my car would even work. And despite it being the middle of summer in Florida, the experience went great!

The extractor fans worked exactly as designed, and window covers made sure no one was the wiser of my presence.
Like with the cooking experiment, I learned a ton and modified my set up accordingly. Much of what I did was to increase comfort, which you can read about here: How to Sleep Comfortably in a Car – My Experience
Anyway, it’s time for a tour! This video was taken after I had already spent about 2 months living out of the car full time on a trip I took up to Maine.
I couldn’t be happier with the outcome of this project. I now have a way to travel at the drop of a hat. Say yes to events that I couldn’t afford hotels for. And feel stable and secure no matter my living situation. All for the price of a little extra gas and some plywood!
I want to give a special thanks to my dad Kent Weakley for helping me with all the woodwork and heavy lifting with this conversion. I honestly couldn’t have done it without his tools and expertise, so I am incredibly grateful!
Like This Post? Consider Signing Up to the Mailing List for Updates and Exclusive Content!

[…] few months later, I found myself unbolting the back seats of my RAV and measuring out supports for a piece of plywood what would become my sleeping […]
Huge help! Thank you! You lost me with the fans but my ’09 does not have a sunroof and I’m not an engineer, so it figures I wouldn’t be able to follow you. Did you have any problems with moisture? I spent 3 weeks in my RAV and I found that as soon as one thing got wet — like my hiking boots — the wet became almost contagious. It spread to everything. If you have found a recipe for an awning, I’d really be interested in that! Happy travels! Katie
Hey Katie. No, I’ve never really had that problem. Actually, because I had air being pulled out of the car through the sunroof all night, I didn’t get much internal moisture at all. I also found that with the window covers being made from a thick fabric, they also absorbed some condensation and prevented the windows from fogging over. I think a little more ventilation would definitely help your case. Or, you could try getting one of those “clothes closet moisture absorbers” and try putting one by your boots. I hope this helps!
[…] you’ve read through my conversion post you’ll remember these. As you can see from above, they do a great job of blocking out almost […]
Hey are you still living the vanlife in your RAV? I’ve started planning out the process for mine and was wondering if you’ve thought about printing more of those shrouds and selling them. Or making more of your whole extractor fan units and selling those. Originally I was going to make velcro curtains but your reflectix covers have me convinced that’s the way to go! You’ve got an awesome setup!
Like, half joking but half serious can you come do this for my car? XD I have the same kind of rav4… will be on the road for about 5-6 months and am trying to figure out what to do to the inside. This is all excellent.
I would totally hire them both to convert my Rav4. Call me 9705996450
Wow, this is what I’ve been looking for. You did a great job. Kudos…
As the others have said, thanks so much for creating this for us! So a thought for those of us that don’t have the sunroof: same process for venting out the passenger windows with the awning covers, right? We are getting into my “build” this weekend!!! And one other thought: how close did you get to your $350 budget?
Very cool! Have the same vehicle and stumbled across your site and videos and love it! Your window guides have been especially helpful.
I agree with one of the posters above- I would be totally interested in buying the fan extractor moldings as well, if you’d ever be inclined to make some more and sell them.
Hope all continues to go well for you!
+1 trying to by some extractor housing from you!
[…] planning my summer trip, which I would embark on in my RAV4 camper conversion, I came to terms with the fact I would have to sleep in some of the country’s hottest […]
I like what you did with your dad to your Rav4. First my husband died and much later my dad passed away 3/25/2017, so I don’t have a man, in my life, to help me convert my Toyota. Any chance I can hire you two to help me with my conversion project? I need to be on the road by April 2019 from Florida to Idaho to look for property and will be using my Rav4 to live in for this scouting trip. Please feel free to call me 9705996450, perhaps we can meet on the way for the build out. Thank you.
Hey! Great site, especially since this is the exact vehicle i’m about to convert for travel life. One question… why did you choose to make the floor so high? I’m asking bc in my mind, the lower the floor the more space I have to sit up, but I wondered if there was an actual structural reason for it? Thanks in advance 🙂
So glad to hear you like the content! I guess I should have made this more clear in the post. Once I removed the seats, there was a grey plastic tray in the middle of the empty cabin between the wheel wells. This covered up the metal axle box (I tried removing the plastic bits but it didn’t free up much vertical space). Since this feature wasn’t coming out I built the platform to be about half an inch from touching its top edge. I’m 6ft and I can still sit up with head room in my conversion. I’d recommend you make the platform as tall as possible while still being able to sit up since it’ll give you more storage. Head room is wasted room once you’ve laid down. Hope this helps!
Were the back bolts in the rear seats easy for you to get to? I’m trying to remove my rear seats… I was able to get the bolts in the front off but the ones in the back are extremely difficult to get to.
Hey Ellie, yes the bolts are really hard to get out. Try using a large socket wrench or crescent wrench. Also when you do get them out, put all the bolts back into the holes they came from so you don’t loose them. There are some good YouTube videos about removing the seats in a RAV4. Good luck!
Hi! Thank you for this great info. I’m helping a 76 year old homeless man currently sleeping in his RAV4. I like how you set up the bed and the mattress you recommended from Amazon. You’re obviously much younger than the gentleman that I am trying to help but how easy is it to get in and out of the RAV4 through the back? Would you recommend some sort of very small step stool? He isn’t very tall – maybe 5’7” at best but not in the best health to be jumping in and out of the car. Any suggestions would be helpful. Thank you!
I’m writing a blog post about my build and I mention you and link to this post, just want to make sure that’s okay with you and see if there is anything specific you want me to say/not say? I can email you a copy of the text if you’d like.
That sounds good to me. What’s your blog?
Hiya Lucas. Are you still reading replies to your fabulous idea?
I’m wondering a few things…. can you pop the back seats in easily? and other stuff.
Ps. I’m doing this project with my 80 year old father and, whereas he has all the tools, he doesn’t have all the energy. Do you just happen to have the measurements to help get me started? I’ve never done something like this and any help is welcome and I would be grateful for. I have a 2012 Rav 4 so i believe the measurements should be the same.
Where do you usually stay overnite? Just wondering where you felt safest on your journey(s).
Hi there….loving all your info and tips, as I am thinking about doing this with my 2010 Rav 4.
I would like to get some ideas about how to just have one side with a “bed”.
I’m looking for a temporary/removeable way to convert my 2016 Mini Cooper Clubman “and” maximize space and efficiency. I have limited carpentry skills, but am handy with tools. I’ve done pretty well planning for week long camping trips, but I think I could do better. Do you consult on ideas and offer suggestions/planning schematics for DIYers?
Great site! I also have a Rav4 (2003) and am so inspired by what you did! But I want to be able to travel with my wife. Do you have any thoughts about making your bed platform go all the way across?
I have a 2003 Rav4 also. I wanted to modify my SUV so that I didn’t have to pitch a tent when camping. I’ve just built most of the sleeping platform. The platform can be 48″ wide (not as wide as a full-size bed, so you’ll be cuddling your wife). I made the supports for the plywood sleeping platform 15.5″ high to go over the wheel wells. I made a stationary platform for the back part of the SUV (48”x24.5”). There’s lots of storage room underneath. A cooler can fit there. I made a second section for the space where the back seats sat (48”x29.5”). I made the supports out of 2″x4″s with removable pins so that I can remove that section and place it on the back section. Then I can put in the back seats to use. I got the idea of the removable section from a YouTube video. I’ll add a smaller section to the front of the second one using hinges so that I can fold it back on the second section when driving. I’ve covered the sleeping platform with indoor/outdoor carpet. I’ll use a full size blow-up mattress not completely filled so that the sides can turn up on the sides of the SUV. I hope that gives you some idea of one way you can build it.
I own a 2015 RAV4 LE that I love use to go on road trips for 3/4 days up to 2 weeks. Mostly I stay in motels and buy my meals. I and my family have camped in New England and in Colorado but I haven’t done that in 25 years. I have been giving thought to converting my RAV4 to a small camper for single person use on road trips but not to live in it. I have gotten a lot of ideas from your post and think that I will give it a try. Cooling could be a problem as my vehicle has no sun roof. I want to keep the full 4 person seating so I have the issue of making that work to provide a level sleeping platform. I’m planning a 2 week road trip through Western NE, WY, Western MT and ID in June. More than enough time to get the work completed as long as the snow stops.
In the first image you see the smaller of the two trunk spaces in the rav4. You left it in place. Any idea what’s under it? It is Also removable?
Could you prepare a post/video of where you store things? Like clothing (you mentioned shoes). Do you use a canopy for when it rains? Do you use an external solar battery at all?
I am so late to this party but you are my hero! I’m psyched to try building some of this in my Rav4! Those extractor fans were genius! Thanks for sharing your project!
For my 2019 Ford Escape with hatch sport tent attached: I’m looking for a drawer slide out to (with the lifted back open, I can slide out my 63 qt Alpico frig/ freezer and piano hinge more table top with a drop down support leg. A friend will build if I can find a design. Any recommendations would be appreciated. FYI: within a year I will move all to Ford Transit camper/van buildout.
Im in florida and about to go on a trip to texas, taking the coastal panhandle route starting out in Edgewater/New Smyrna Beach.
If youre anywhere near, i would love the opportunity to get some insight on some things
I’d be interested in how the removal of the back seats went. Did you have a mechanic pull and cap the appropriate seat belt sensor wires?
Here’s another thing I’ve been thinking about. I plan to put some shallow shelving units on the sides…over the rear fixed windows and extending to the back door jamb. However, the side airbag is there. Does anyone know if it’s possible to “switch off” the side airbags when in camper mode? Do the airbags blow off the entire panel between the door and the little rear window?
Is that foam mattress you bought on Amazon firm?
Thanks.
I removed the rear seats of my ’16 RAV and built a plywood platform with pieces of 2×4 for supports. (Two longer in front, two smaller in back, one in center to prevent bowing)
I keep clothing/shoes in soft bags stuffed under the platform, a cooler seatbelted in the front seat, and my folding chair, roll-up table, cooking gear/dry foods in a CarPod mounted on the rear hitch. (I chose to use the CarPod rather than a roof box to keep the noise and drag to a minimum.)
It works better for me – a single retiree – than my last motorhome ever could.
Safe travels, everyone!
Gardner
Nice content and interesting ideas that every car owner can follow through it.